05 Mar 2013, 09:06

Using a Wii Nunchuck instead of Cheese to control i-Racer RC car on @Raspberry_Pi and @Arduino

#“Using a Wii Nunchuck instead of Cheese to control i-Racer RC car on @Raspberry_Pi and @Arduino”

Following up from the Cheese

After the enormous attention that the Cheese Controlled Car got, my thoughts moved to what else we could use with the i-racer. Two immediately came to mind: the Wiimote and a mousepad. But both went in directions I didn’t expect. I’ll write up the mousepad at a later stage but this post is about the Wii.

The Wiimote is an amazing device. I don’t think the average person realises that it has a VGA infrared camera at the front, has a bunch of accelerometers inside and communicates with the Wii using Bluetooth.

The bit I didn’t know until recently was that it also talks to the Nunchuck using I2C (I squared C, not I two C). This is a brilliant low-level communications protocol invented by Philips many years ago to make it very easy for inter-IC communication using just two wires. I spent a lot of the 1990s writing and debugging I2C drivers.

This made me realise I could dump the full Wiimote and just use a Nunchuck. Both Raspberry Pi and Arduino support I2C and there is tons of code on the web for both platforms.

TL;DR - If you want to jump straight to the outcome, here’s a really rough video of it in action:

httpv://www.youtube.com/watch?v=pEPdQ4GKqdY

Whilst there are adapters out there to get at the Nunchuck’s pins, I decided to just cut the cable and go direct. A lot of our Nunchucks have rusty connectors due to the kids blowing on them to get a “better” connection. So they are basically spittle-filled. Gross I know.

A few minutes of soldering and I had the Arduino happily reading the joystick, buttons and accelerometer of the Nunchuck. But then I sussed that the simple serial Bluetooth dongle I had bought on DX to talk to the i-racer was Slave-mode only (HC-06) whereas I needed the more expensive Master-Slave one (HC-05). I managed to find the right one on Elec Freaks.

Using Raspberry Pi and Python

Whilst I waited for that to arrive, I decided to return to the Raspberry Pi and use that. Its I2C interface is available on some of the external PINs as follows:
  • Pi pin 1 is 3.3V and connects to the Nunchuck Red Wire
  • Pi pin 6 is Ground and connects to the White wire
  • Pi pin 3 is the I2C Data Line and connects to the Green wire
  • Pi pin 5 is the I2C Clock Line and connects to the Yellow wire
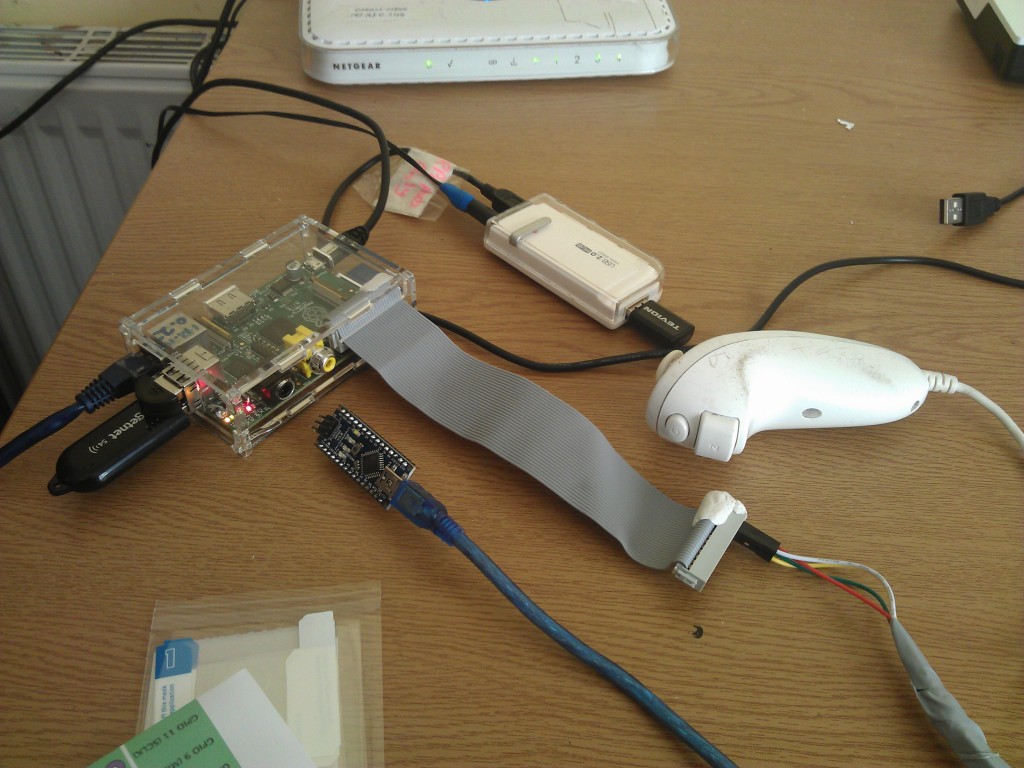
Then you need to do some simple installs on the Raspberry Pi to enable I2C and access it with Python:


sudo modprobe i2c_dev
sudo modprobe i2c-bcm2708
sudo apt-get install i2c-tools
sudo apt-get install python-pip
sudo apt-get install python-smbus

sudo nano /etc/modules

Add these lines, save and reboot:


i2c-bcm2708
i2c-dev

sudo nano /etc/modprobe.d/raspi_blacklist.conf

Comment these lines out with a #


blacklist spi-bcm2708
blacklist i2c-bcm2708

If all is working well you should see 52 mentioned when you type this:


sudo i2cdetect 0

(use a 1 instead of a 0 if you have a newer Raspberry Pi)

Then you can use Python like the following (courtesy of sidb on the RPi site) to report on what the Nunchuck is doing:


import smbus
import time
bus = smbus.SMBus(0)

bus.write_byte_data(0x52,0x40,0x00)
time.sleep(0.1)
while True:
 try:
 bus.write_byte(0x52,0x00)
 time.sleep(0.1)
 data0 = bus.read_byte(0x52)
 data1 = bus.read_byte(0x52)
 data2 = bus.read_byte(0x52)
 data3 = bus.read_byte(0x52)
 data4 = bus.read_byte(0x52)
 data5 = bus.read_byte(0x52)
 joy_x = data0
 joy_y = data1
 accel_x = (data2 << 2) + ((data5 & 0x0c) >> 2)
 accel_y = (data3 << 2) + ((data5 & 0x30) >> 4)
 accel_z = (data4 << 2) + ((data5 & 0xc0) >> 6)
 buttons = data5 & 0x03
 button_c = (buttons == 1) or (buttons == 2)
 button_z = (buttons == 0) or (buttons == 2)
 print 'Jx: %s Jy: %s Ax: %s Ay: %s Az: %s Bc: %s Bz: %s' % (joy_x, joy_y, accel_x, accel_y, accel_z, button_c, button_z)
 except IOError as e:
 print e

You interpret the Nunchuck data as follows:


Byte Description Values of sample Nunchuk
1 X-axis value of the analog stick Min(Full Left):0x1E / Medium(Center):0x7E / Max(Full Right):0xE1
2 Y-axis value of the analog stick Min(Full Down):0x1D / Medium(Center):0x7B / Max(Full Right):0xDF
3 X-axis acceleration value Min(at 1G):0x48 / Medium(at 1G):0x7D / Max(at 1G):0xB0
4 Y-axis acceleration value Min(at 1G):0x46 / Medium(at 1G):0x7A / Max(at 1G):0xAF
5 Z-axis acceleration value Min(at 1G):0x4A / Medium(at 1G):0x7E / Max(at 1G):0xB1
6 Button state (Bits 0/1) / acceleration LSB Bit 0: "Z"-Button (0 = pressed, 1 = released) / Bit 1: "C" button (0 = pressed, 1 = released) / Bits 2-3: X acceleration LSB / Bits 4-5: Y acceleration LSB / Bits 6-7: Z acceleration LSB

However, despite multiple attempts, I haven’t been able to read reliably from the Nunchuck on the Raspberry Pi. An appreciable percentage of the data comes back as 0xFF. I have no idea if it’s the wiring, the RPi CPU, the I2C driver in Linux, the I2C library in Python, timing or the code above. I don’t believe the problem is the Nunchuck as I now have it working 100% reliably on the Arduino. In any case, the RPi was only ever going to be the proof of concept platform as we obviously need something more portable and less power hungry if we are going to chase a remote control car around the house.

Using Arduino and HC-05

Last week the HC-05 module finally arrived from China and I was able to start playing with it on an itty bitty Arduino Nano yesterday. Using the basic instructions and code from here, after a lot of misunderstanding what pin did what, I was able to connect to the HC-05 and it was able to connect over Bluetooth to the i-racer.

I pulled in the Arduino Nunchuck code from here and converted my Raspberry Pi Python to Arduino Processing (basically a C variant). My code maps the wide range of movement in the Nunchuck joystick to the basic 6 degrees of freedom plus speed on the i-racer. It took quite a few hours of Googling before I finally sussed that “arccos” was the mathematical function I needed. So the code splits 360 degrees into 6 segments of 60 degrees. That gives us Stop/Right Forward/Forward/Left Forward/Left Backwards/Backwards/Right Backwards. Speed ranges from 0 to 15.

It was a real delight to see the i-racer responding with no delay to my thumb movements but the code definitely needs tuning and I’m pretty sure the Nunchuck is not giving a full range of motion. It’s pretty ancient and so hard-left does not give the same value as hard-right for example.

Fionn was thrilled as I’ve been promising him I’d get it working for the past month! Interestingly, his first instinct was to use the accelerometer in the Nunchuck instead of the joystick. This must be how most Wii games work. It shouldn’t be too hard to switch the code over to using the accelerometer but we’ll use this for a while.

After a few more goes, both Fionn and Oisn pointed out that their natural action was to move the joystick in the direction they wanted the car to go, relative to them. I think I’ll leave that for another day :-)

Being able to run the whole thing off 4 rechargeable AA batteries is a real plus. I’m also a huge fan of the Shrimping It project which is a minimalist Arduino setup using little more than the ATMega itself. I have two and the idea is to replace the Arduino Nano with one and make the whole thing even smaller again. The i-racer runs out of juice way faster than the remote ever will so I may be able to try AAA rechargeables or maybe a little Lipo battery.

You can find the Arduino code on Github.

Next up is probably a left-over Nintendo DS touch-screen as the controller. I also think we’ll start adding “headlights” and an ultrasonic detector for collision avoidance. These will require changes to the i-racer firmware itself so you’ll probably hear from me again in 2017!

26 Feb 2013, 11:34

Ron Swanson is the Patron Saint of Makers - His Finest Moment on Parks and Rec

#“Ron Swanson is the Patron Saint of Makers - His Finest Moment on Parks and Rec”

I am going to miss this show so much when it ends. Leslie needed two wedding rings asap. Ron took care of it.

httpv://www.youtube.com/watch?v=d0YAhykMMxc

When I grow up, I want to be Ron Swanson.

10 Feb 2013, 11:40

Electronic Tinkering on the @Raspberry_Pi and @Arduino

#“Electronic Tinkering on the @Raspberry_Pi and @Arduino”

I’ve been lucky to-date that I haven’t killed the RPi stone dead with my little projects. I find the simplest way to help avoid any catastrophic shorts is to use an old 40-core IDE cable (note, the “newer” 80-core ones don’t work even tho they fit). I Dremeled mine last week to fit in this very nice inexpensive case.

In many ways, that GPIO header on the RPi is like the expansion port on the ZX Spectrum. So much possibility, so much danger :-)

I’m finding myself jumping back and forth between the RPi and Arduino a lot recently. Arduino is amazing because of the huge body of code and boards that are available. Interfacing to most things often just requires wiring it straight in and pasting some code off the web. In the picture above you can see an Arduino Nano which is both tiny and cheap ($10). Where Arduino falls down is when complexity is required. A 8-bit CPU can’t just be connected straight to the internet or to a Bluetooth USB dongle. This means that some of the add-on boards (particularly Wifi) cost multiples of the Arduino itself.

TheArduinocode for Nunchuck worked perfectly first time, but right now I’m waiting on a Bluetooth Master module from China to connect it to the i-Racer ($10 module vs $2 USB BT dongle). Whilst I’m waiting, I’ve been trying to get the Nunchuck working on the Raspberry Pi. I’ll do a full post in a few weeks but suffice to say it has not been straightforward. Scanning I2C reliably with Python is proving a struggle and I don’t know if it’s HW or SW related. Having a Python runtime and Linux kernel between your code and the Nunchuck may not be the best for realtime performance. Compare that to the Arduino code which is raw machine code with no OS, reading its pins directly on a bullet-proof I2C bus.

There are many types of boards out there to make interfacing to the Raspberry Pi easier. They range from simple breakout boards converting male headers to female headers all the way up to big motor control boards with their own microcontrollers. I haven’t bought any of these yet, so it’s up to you to figure out what is most appropriate for your project.

Slice of Pi Only 3.90, this is a breakout board which just makes it easier to connect jumper wires and less likely that you’ll short anything out. One of its headers is XBee compatible. Probably worth getting no matter what you are doing. Very simple self-soldering to assemble and comes with all the parts

UPDATE 1 - 16/02/2013: Slice of Pi/O Big thanks to Conor Houghton for pointing out this board which I had missed. It is the Slice of Pi with an IO expander chip. The basic idea is that you communicate to the chip using I2C and it handles all the actual interfacing and buffering. So your RPi is much less likely to be damaged. If you damage the MCP23017 chip itself, you just pop it out and put in a new one for 1.53 from Farnell. Lots of info about it here. This is in fact the board that I ended up buying. It is only 7.89 delivered to Ireland which is in keeping with the low price point of the RPi itself.

PiCrust This is similar to the basic Slice of Pi but has more headers. However you have to order all the parts separately yourself. Still very inexpensive.

Adafruit Prototyping Plate This is the same idea again but with lots of connectors and plenty of space to permanently solder things on. $16 in US and I’m sure someone is selling on this side of the pond too.

PiFace This is more complex and has relays, motor control, switches etc. At 25 it won’t break the bank and comes fully assembled. You can program in Python, C and Scratch. The last one is verrrrry interesting for something like Coder Dojos. I showed my RPi at Bandon Coder Dojo last week and got a ton of interest from kids and parents. Being able to do robotics in Scratch would blow a lot of their minds.

UPDATE 2 - 17/02/2013: RaspiRobot Board This was just announced by Sparkfun on Friday. It’s specifically for robotics and seems decent value at $29.95. After you’ve assembled it, it provides dual bi-directional motor controllers, two open collector outputs, two switch inputs and a voltage regulator capable of powering the Pi itself. A LiPo battery or 6 x AA batteries should provide the juice you need. Obviously Model A is the one to go with for robotics due to the much reduced power consumption.

Arduino Shield Bridge This is a neat idea. It makes it possible to connect Arduino Shields (shields are the Arduino add-on boards) to your Raspberry Pi. Whilst boards like Wifi are expensive on Arduino, there are tons of control and interfacing boards which are very cheap. Things like Joystick boards, environmental sensors, heavy-duty motor control, RFID, XBee etc. They have created an Arduino-compatible library so you can use some of the same Wiring code on the Raspberry Pi that you would use on Arduino. Note that this can’t work with everything but their site is good in explaining what will work. It is 40 which isstartingto get pricey for something which may only be suitable in a subset of cases.

Alamode This takes the same Arduino idea and extends it further by basically giving you a full Arduino board which plugs neatly into the Raspberry Pi. You can see it as either adding Arduino functionality to the RPi or giving the Arduino very inexpensive Ethernet capabilities. However at $50, we are now at twice the price of a Model-A Raspberry Pi and many Arduino boards. So youreallyneed to be sure this is something you need and will use. I’ve hooked Arudino up to RPi but only using USB. Clunkier, simpler but a lot cheaper.

Gertboard This is probably the best known board as it was designed by one of the people originally involved in the RPi design. Whilst it is not “the official board”, many people see it as such. It is a very high end board with lots of functionality, particularly around motor control for robotics etc. It even includes the same ATMega MCU as an Arduino. Originallya kit, you can now buy pre-assembled for 30. My guess is that it will see the most community support due to its high profile. But like so many of the other boards I’d point to the fact that it’s more expensive than the RPi itself.

If I’ve missed any others, please let me know in the comments. At the minute I’m tending towards the simpler breakout boards. With a little care, you should be ok and they aren’t adding much to the overall cost of the RPi. The power requirements of the Pi mean that using it for robotics etc probably isn’t a runner for me and I’ll stick with the Arduino for that. Ditto anything that I want to do outdoors. But for projects where you need to get the data online, an RPi is ideal.

I’mparticularlyexcited by the idea of using Scratch to both interface to the real world and maybe even access the web. I wonder is anyone working on web services functionality for Scratch? I was disappointed that no-one did the same for MIT App Inventor and the IOIO board.

Actually, that reminds me I meant to blog about ModKit. An absolutelybrilliantArduino project to bring Scratch-style/App-Inventor-Style development to that platform.

You install a simple program on your PC and then do everything else in the browser (desktop app optional). It’s amazing to drag a few blocks in a browser IDE which say “blink LED” and then the LED on the Arduino on your desk starts blinking! It’s projects like this that will get kids interested in hardware and electronics big time. Perhaps it might eventually support RPi plus one of the boards above.

14 Jan 2013, 11:04

Absolutely loved @conorjh's love letter to 1983 and home computing

#“Absolutely loved @conorjh’s love letter to 1983 and home computing”

Even if he did have a stinky VIC-20 instead of a ZX Spectrum. Colour clash was a feature dammit.


httpv://www.youtube.com/watch?v=SUjLP7rthfg

13 Jan 2013, 15:47

The Cult of Done Manifesto

#“The Cult of Done Manifesto”

I feel a bit stupid that I only just discovered this 4 year old post by Makerbot’s Bre Pettis via Sean Bonner. Everything about it resonates with me. Not in some GTD process way but in an attitude to everything.

Like most people I’ve had my phases in the past of analysis-paralysis. What-if, what-if, what-if?

I now try as much as possible to just do it. Have an idea, figure it out, create the first version, “ship” it, do the next one. If it works or is interesting, do the next one. If there is no interest or it doesn’t do what you had hoped, drop it, do something else.

From Sean’s blogpost:

The reason Woody Allen said ‘Eighty percent of success is showing up’ is because eighty percent of people dont show up.
This isn’t just for work. It should be how you do your hobbies, get fit, lose weight, change job, learn a skill, plan your vacation or deal with life’s problems.

And as the manifesto below says:

Done is the engine of more
Point 12 below really resonates with me. I think I’m banning myself from writing blogposts about how “Someone should do X” or “Company Y should do Z”. From now on, either I do X/Z or I STFU.

OK, enough righteous pomposity from me. The manifesto.

  1. There are three states of being. Not knowing, action and completion.
  2. Accept that everything is a draft. It helps to get it done.
  3. There is no editing stage.
  4. Pretending you know what you’re doing is almost the same as knowing what you are doing, so just accept that you know what you’re doing even if you don’t and do it.
  5. Banish procrastination. If you wait more than a week to get an idea done, abandon it.
  6. The point of being done is not to finish but to get other things done.
  7. Once you’re done you can throw it away.
  8. Laugh at perfection. It’s boring and keeps you from being done.
  9. People without dirty hands are wrong. Doing something makes you right.
  10. Failure counts as done. So do mistakes.
  11. Destruction is a variant of done.
  12. If you have an idea and publish it on the internet, that counts as a ghost of done.
  13. Done is the engine of more.
But it gets better. James Provost expressed those 13 points using a Rubik’s Cube:

Done Manifesto

And Joshua Rothaas made this cool poster. Both now printed and on my wall.

Cult of Done

29 Dec 2012, 18:45

MaKey MaKey + Raspberry Pi + iRacer + Bluetooth = Cheese Controlled Car (CCC)

#“MaKey MaKey + Raspberry Pi + iRacer + Bluetooth = Cheese Controlled Car (CCC)”

When Santa told me that he was getting an i-Racer remote controlled car for Fionn, I was very excited. This is a remote controlled car that, on the surface looks very crude. Heck it doesn’t even come with a remote control.

That’s because it’s Bluetooth-controlled! You can install a simple Android App, pair with the car and control it either with on-screen controls or using the accelerometer in the phone.

As a standalone present it is pretty neat but like all remote controlled toys, I’m sure would be discarded after a few days use. However Santa didn’t want to spend a fortune on a full-blown Arduino-based robot platform or an even bigger fortune on Lego Mindstorms.

It’s when you start thinking about what is possible over time with the i-Racer that things get really interesting. Forgetting electronics for a minute, you could have huge fun making new shells for it out of different materials. Imagine a Foldify template for it so you could make printed paper shells. Lego might be a bit heavy but K’Nex plus some Sugru could work very nicely. Or what about bamboo food skewers or ice-pop sticks? Maybe just some stickers.

Then there is the code running on the car. The source is available so you can play around with it. Now this isn’t the easiest thing in the world to do since the car is not Arduino so you need compilers and special programming dongles, but the option is there.

Taking that one step further, you could clip on other bits of electronics. I have a temp sensor, a PIR detector and an Ultrasonic distance detector all winging their way from China. You could use these to give the car a lot more “intelligence”. There is also someone working on porting the car’s code to Arduino since the microcontroller is compatible.

But that stuff is hard and more long term and wouldn’t actually involved Fionn doing much. Always have to keep your focus on the “customer”! So I thought about it some more and realised that you could have enormous fun with how you control the car. The use of Bluetooth gives you a giant range of pretty cough easy possibilities.

So I started playing with some Python code and after a ton of dead-ends, Linux bugs and system problems I was finally able to talk to the car from my Ubuntu PC with a $2 Bluetooth dongle. (Details below)

Then I realised that this would be no use over Christmas as we spend it travelling to family houses around the country without the Ubuntu PC. My Windows laptop should work with tweaks but that’s not for games! So I started looking at the Raspberry Pi. Whatever problems I had run into on my PC were 10x worse on the Pi. (More details below)

After a ton of messing I got keyboard control working the way I wanted over USB on the RPi. Which leads to the piece de resistance - MaKey MaKey control. MaKey MaKey is a beautifully simple idea. It’s an Arduino-compatible board you plug into a PC and it emulates various key-presses and mouse clicks. You then connect whatever you want, as long as it is vaguely conductive, and use that for input. It famously uses bananas, pencil drawings and buckets of water as inputs to various fun software.

The Cheese Controlled Car (CCC)

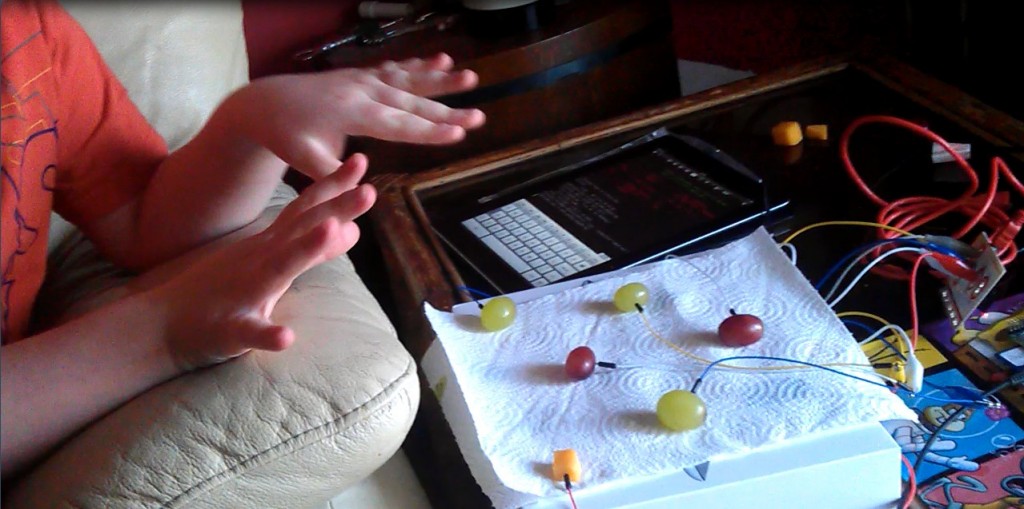
So Fionn finally had the ultimate car controller. 5 Pieces of Christmas Cheese connected to a Raspberry Pi via MaKey MaKey talking to a car over Bluetooth. Check it out in action:

httpv://www.youtube.com/watch?v=qb9wso0pB4o

If you want to try this yourself and run into any problems, pop a comment in below.

Otherpossibilitiesinclude grapes (GCC):

And Barbie (BCC):

Now for the nasty details. Whilst these steps are quite short and the code is very simple, it took a week of evenings cursing, hacking and googling to get everything working right.

Technical Nitty Gritty

UPDATE 1: Much improved code compared to the simple one below is now available on GitHub.

The main steps in getting the code to run were as follows:

  1. Figure out Bluetooth on Linux usingBluez
  2. Figure out how to connect to car over Bluetooth using Python withPyBluez
  3. Sort out bad bug in Bluetooth on Debian (and therefore Ubuntu)
  4. Realise that most cheap micro Bluetooth dongles from China have duplicate MAC addresses and cannot talk to each other.
  5. Discover that Bluetooth dongle works on USB hub on Raspberry Pi at low-level but Bluetooth stack cannot see it. So connect it to one of USB ports on Raspberry Pi
  6. Discover that cheap Chinese Bluetooth dongles hang the Raspberry Pi after random amount of time
  7. Switch to using older bigger more expensive Bluetooth dongle
  8. Realise that Bluetooth dongle must be plugged in after booting Raspberry Pi in order for it to be detected
  9. Repeatedly curse the totally messed up implementation of USB on the Raspberry Pi
  10. Use a powered USB Hub to connect the MaKey MaKey and anything else like WiFi to the Raspberry Pi
  11. Figure out basic keyboard reading in Python
  12. Figure out reading keyboard in Python without carriage-return
  13. Try PyGame for keyboard reading but discover it needs a screen attached
  14. Figure out reading directly from USB with auto-repeat usingEvdevandpython-evdev(must be run as sudo)

Installs and Tweaks


sudo apt-get update
sudo apt-get upgrade
sudo apt-get install python-pip python-dev build-essential
sudo apt-get install –no-install-recommends bluetooth
sudo apt-get install bluez python-bluez bluez-hcidump
sudo pip install evdev

Now you need to work around a nasty bug in Debian and Ubuntu. They have accidentally compiled in code for Nokia Series 60!


sudo nano /etc/bluetooth/main.conf

add this line to it:


DisablePlugins = pnat

Now plug in the Bluetooth dongle, power up the i-racer and run:


hcitool dev

It should detect your dongle and report its MAC address. If it does, then run:


hcitool scan

This should find the i-racer as a Dagu Car. Note its MAC address and then pair to it by running:


bluez-simple-agent hci0 00:12:05:09:94:26

where you replace 00:12:05:09:94:26 with the MAC address of your car. The PIN is either 1234 or 0000

In a Python shell, (sudo python) run the following to find out your Keyboard or MakeyMakey ID:


from evdev import InputDevice, list_devices
devices = map(InputDevice, list_devices())
for dev in devices:
 print( '%-20s %-32s %s' % (dev.fn, dev.name, dev.phys) )

My MaKey MaKey comes up (with KB/Mouse/Joystick disconnected) as:


/dev/input/event0 Unknown USB IO Board usb-bcm2708_usb-1.3.3/input2

The Code

Finally run this code as sudo to control the car using the MaKey MaKey:

import sys
import select
import tty
import termios
import bluetooth
import time
from evdev import InputDevice, categorize, ecodes

if __name__ == '__main__':

 dev = InputDevice('/dev/input/event0')

 bd_addr = "00:12:05:09:94:26"
 port = 1
 sock = bluetooth.BluetoothSocket( bluetooth.RFCOMM )
 sock.connect((bd_addr, port))

 for event in dev.read_loop():
 if event.type == ecodes.EV_KEY:
 key_pressed = str(categorize(event))
 if 'KEY_LEFT' in key_pressed:
 # 0x5X for left forward. 0x51 very slow. 0x5F fastest
 sock.send('\x5A')
 if 'KEY_RIGHT' in key_pressed:
 # 0x6X for right forward. 0x11 very slow. 0x1F fastest
 sock.send('\x6A')
 if 'KEY_DOWN' in key_pressed:
 # 0x2X for straight backward. 0x21 very slow. 0x2F fastest
 sock.send('\x2A')
 if 'KEY_UP' in key_pressed:
 # 0x1X for straight forward. 0x11 very slow. 0x1F fastest
 sock.send('\x1A')
 if 'KEY_SPACE' in key_pressed:
 #stop
 sock.send('\x00')

Note that this is extremely simple control with fixed speed just to prove the idea works. Real code will go up on GitHub when it has much more usable controls with automatic acceleration/deceleration etc and after I make it configurable with any i-Racer and with the MaKey MaKey on any USB port.

What’s next?

Apart from extra sensors and new outer shells, I want to do more playing with controllers. I have an Arduino Joystick shield, Arduino Nano and serial Bluetooth breakout board coming from China. It’d be cool to make some sort of interesting custom controller case with the Arudino controlling the car. I may also get an Arduino Esplora.

The other really obvious one is to stick with the RPi and pair a Wiimote to it too. That could be the ultimate controller for the car.

One downside of the i-Racer is that Arexx, the Chinese manufacturers, have not released the source-code to their Android App, only to the car software itself. Given how trivially simple the control protocol is, it should be very easy for someone to create Open Source equivalents for Android and iOS or even WP8 or BB10. I’m currently poking around inside PhoneGap’s Bluetooth support (this plugin) to see if a simple cross-platform Mobile Hybrid App could be created.

If this is a success, with success being defined as Fionn remaining interested, then I’ll bite the bullet and start getting the parts for one of the good Arduino robot kits out there. A good intermediate step might be the Sparkfun Protosnap Minibot Kit. After that, the sky is the limit:

27 Dec 2012, 13:41

ScriptCraft - A Minecraft mod that lets you build using Javascript

#“ScriptCraft - A Minecraft mod that lets you build using Javascript”

Walter has just posted his ScriptCraft code to GitHub. This Minecraft mod lets you create buildings etc using only Javascript. Very very cool indeed. I’ll be trying it out later with some of the kids. My Minecraft experience is minimal so I’ll let them guide me.

He has included an example cottage script which should be a good starting point for a lot of people.

Go Fork and Prosper :-)

06 Dec 2012, 13:51

Wondering how hard it would be to create your own electronic toy? @sifteo says pretty hard!

#“Wondering how hard it would be to create your own electronic toy? @sifteo says pretty hard!”

We’re all guilty of under-estimating how hard it is to do other people’s jobs. After reading M. Elizabeth Scott’s fabulously detailed blogpost on Adafruit about the creation of Sifteo’s second generation toy, I’ll never do that about toy makers again!

The post dives deep, real deep. As an old Embedded Fart, I revelled in every little detail.

The Sifteo itself is still out of our price range but I hope that’ll change as the volumes grow. It’s a really interesting idea:

httpv://www.youtube.com/watch?v=fEqq8JykQoQ

27 Nov 2012, 12:01

Imagine if Minecraft was the trigger to get a new generation of kids programming?

#“Imagine if Minecraft was the trigger to get a new generation of kids programming?”

Walter thinks that the next big Social Network will be Minecraft. I think he might be on to something. Our kids either love playing it or watching their older siblings do so.

Over the weekend, it was announced that the Pocket Edition was being ported to the Raspberry Pi. I was excited but our eldest son pooh-poohed the news since he has tried Pocket on his Android phone and it doesn’t compare to the full thing.

But then came the kicker: you’ll be able to access it programatically in any language over a network connection! As they point out in the blogpost today:

The more creative programmer will only be limited by their imagination. Want to build a digital clock into the wall of your house which displays the real time? Easy. Want to get back at a friend who stole your precious diamonds? Remove the floor from underneath their feet and let them fall into a pit of lava. The possibilities are endless.
httpv://www.youtube.com/watch?v=HuvSke6h7Lk

If the future is mobile, then is Pocket Minecraft on Raspberry Pi = the Tween replacement for Twitter?

This is a big deal. I can’t wait to try it.

UPDATE 1: I just realised the GPIO pins on the RPi mean that it should be possible to connect haptic/gesture/wiimote/any interfaces to Minecraft. Or have people been doing that already on the PC version? I’ve just ordered a Makey Makey and you could have huge fun with that.


26 Nov 2012, 09:34

Conor's 2012 @Raspberry_Pi Christmas Gift Guide

#“Conor’s 2012 @Raspberry_Pi Christmas Gift Guide”

This post was prompted by @mollydot asking me last night on Twitter what accessories make sense if you are buying a Raspberry Pi as a Christmas Gift and@jkeyesrightly suggesting that a post with links would be useful.

I really think this Christmas could be a lovely replay of 1982 for a lot of people, like me, who got their first home computer that year. You could have so much fun on Christmas Day messing with the RPi rather than falling asleep in front of the fire. Just don’t fight over who gets the telly when Doctor Who is on.

Whilst the bare-bones nature of the Raspberry Pi is wonderful, it is unusable out of the box unless you are a house with smartphones,digitalcameras and existing PCs already that you can raid for components.

What you want to avoid is a repeat of me that December in 1982 with my brand-new 16K ZX Spectrum which didn’t work on our Nordmende TV until two weeks later when the RTV Rentals guy came and replaced the TV Tuner. Two weeks typing Beep 1,2 to make sure it wasn’t broken.

For most parts, check the list of verified compatible devices here. This is what you need:

  1. The Raspberry Pi itself
    1. You can get it online from Farnell Element 14. Also most of the accessories I mention below. They are quoting a 3 week delivery time so get your skates on.
    2. And available online from RS Components. They have lots of accessories too.
    3. Orrrrr, you can skip everything I have written below and just get theMaplin Starter Kitfor Raspberry Pi. Unusually for them, it’s actually decent value and you know all of the components have been tested for compatibility. There weren’t any in Blackpool in Cork the last time I was there so ring-ahead or order online.
  2. An SD Card
    1. I got these very cheap 16GB ones from 7DayShop in Jersey but the casing on one has shattered after very little use. They have branded ones which should have better quality plastic.
    2. Micro-SD cards in an adapter work fine too.
    3. Get the fastest one you can. Class 10 for full SD works great as does Class 6 on MicroSD.
    4. Any size from 4GB up should be fine initially.
  3. A Micro-USB phone charger
    1. I’m currently using the one from my HTC Sensation.
    2. Anything above 700mA should be fine but that excludes most cheap 500mA chargers that come with Chinese electronics.
    3. I’ve had success with a some of the cheap ones from DX.com in China but many of the so-called 2 Amp ones can barely do 1 Amp so it might be best to avoid. Also, be warned, delivery times from DX can range from a week to many months.
    4. I was very surprised to see an entire shelf of power supplies in a small Maplin in London but not one Micro-USB charger. As a place where a lot of people go to get emergencyreplacementsfor things, they should surely have tons of these?
  4. TV Cables
    1. If the person you are buying for has an LCD/Plasma TV then any HDMI cable will be fine. I have used ones from DX and Lidl with no problems.
    2. If they have a older CRT TV then they will need a video cable with RCA at both ends and an audio cable with 3.5” headphone jack at one end and RCA at the other end. If the TV takes RCA then that’s all they need.
    3. If the TV only takes SCART, then you need an RCA to SCART adapter. Most TV shops have these. Maplin definitely do.
    4. If they have a monitor with DVI then there are HDMI-DVI adapters. Neither of theadapterson DX worked for me. See this page for a list of compatible adapters.
    5. If they have a monitor with VGA then this adapter on eBay may work. Note that it works for me on two monitors here but totally failed on a projector at an event during the summer.
  5. USB Keyboard and Mouse
    1. I haven’t found a wireless one which doesn’t work. Lidl and Aldi both great for these at the right time of the year. Otherwise anywhere online or PC World.
    2. Not all wired keyboards will work as they may draw too much current. I have one roll-up rubber one (don’t ask) which shuts the RPi down when I connect it.
    3. I found a dirt-cheap Microsoft wired Keyboard/Mouse for about 15 last year in Dixons
  6. Powered USB Hub
    1. USB remains a very frustrating experience on the Raspberry Pi. Unlike a PC, it seems to be a crap-shoot as to whether something will work on it or not. The problem is the tiny amount of power the two USB ports can provide (150mA compared to 500mA on most PCs) and some ongoing problems in the drivers.
    2. The best way to avoid this is to get a USB hub that can be externally powered and connect all devices to that. Unfortunately, many of the dirt cheap ones out there that have a power connector don’t actually work with power connected.
    3. This extremely cheap hub($5!) that I got on DX last week seems to be working really well so far. It doesn’t come with a power supply but accepts one. You’ll have to find a 5V one yourself with that smaller size of power jack.
    4. To be absolutely sure, just check this list of compatible hubs.
    5. If you continue to have problems then you may be forced (as I was) to hack the USB cable from the hub to the RPi and disconnect the power lines so that the Hub isn’t sending power back up to the RPi
  7. Wireless Adapter
    1. Whilst the RPi has an Ethernet port, it’s not really that useful for many people whose broadband routers are in the hall. One of our RPis is wired but that’s because we run GigE cabling everywhere.
    2. I have a ton of Wifi adapters collected over the years. Most of them work on the RPi.
    3. I’m currently using some random Wireless-G one to stream a webcam internally.
    4. Again, check the list of compatible ones here
    5. And again, connect it using the hub to avoid power problems
    6. The current version of Raspbian for Raspberry Pi comes with a nice Wifi GUI config tool to make setup very easy indeed.
  8. The Raspberry Pi User Guide
    1. Get it here on Amazon
    2. Because I still have my ZX Spectrum manual and still remember drawing my first circle on the screen using the instructions in it.
  9. A nice case
    1. If you are feeling very generous.
    2. Some lovely ones on the Adafruit site in New York
    3. And this awesome Pibow in the UK
Any questions at all? Pop em in the comments. Not on Twitter or Facebook :-)