27 Dec 2015, 11:34

Simple Christmas Control of each LED in a 150 RGB LED WS2812 strip

One mistake I made with our Halloween setup was buying an analogue RGB LED strip where all the LEDs had to be set to the same colour. Then a few weeks ago, Joe Desbonnet Facebooked about getting a waterproof WS2812 strip with individual LED control. And it wasn’t that much more expensive than the analogue one. Off to eBay I went and ordered one, far too late for Christmas.

So I was chuffed that it arrived on Christmas Eve. Unfortunately the 8 amp PSU I ordered on Aliexpress didn’t arrive. A quick rustle in my psu drawer found a 4 amp one. Another quick rustle in another box found an old Arduino Nano and it took barely 5 mins to load it up with the Adafruit strand test code and wire everything together (one digital pin, gnd, 5v) to give this:

The psu was running warm but not crazily so. However the Arduino kept crashing which hinted that the psu was dropping below 5V to power all those LEDs. So I ran separate power to the Arduino from a phone charger.

This was followed by 4km of duct tape as the connections and Arduino would have to live outside. A gale was blowing as I tried to attach it to the window frame so I switched to the more sheltered door frame. This Mammoth tape worked really well:

And that was it. Almost zero effort for the best house light decoration we’ve ever done. Since these strips can be cut to any length you want and also spliced together, I’ll be fashioning a full house-length monstrosity for next Christmas. However I doubt I’ll ever reach this level:

16 Nov 2015, 22:35

First impressions of @OnionIoT Omega. Also running #golang 1.1.2 and #nodejs 0.10.5 on MIPS

I did a splurge of backing IoT KickStarters a few months ago and the Onion Omega is the first one to land in my postbox. It’s a tiny (barely bigger than an SD card) board running the same basic guts as many OpenWRT routers i.e. 400 MHz Atheros MIPS CPU with 64MB of DRAM and 16MB of Flash.

Onion Omega

If you’re not familiar with OpenWRT, it’s an Open Source community replacement firmware for many routers (similar to DD-WRT that I’ve used many times) and is Linux under the hood. You generally do your own custom Firmware builds which bundle exactly what you want but you can also install packages via the opkg tool.

Obviously 400MHz with tiny RAM cannot compete with an RPi but it is far more powerful than most MCUs and runs Linux. The question is whether this middle ground addresses a big enough market, particularly when the price point is almost the same as an RPi Model A and you need to buy add-on cards to work easily with it. I’m not sure yet.

The Onion team are currently building a Web UI and an IoT “Cloud” as value-adds and of course everything is OpenSource.

The fact that it just launched means that the software story isn’t great right now. The KickStarter mentions things like Node but that isn’t available in a supported way. Also the effort around accessing GPIOs etc is focused on Python. And add-on boards like the OLED screen I bought have no support yet.

Onion Omega Kit

Summary Opinion

Overall it’s a nice board but the lack of “buzz” around it has me a little worried. The number one thing that projects like this need is community. I think the CHiP might steal a lot of its thunder with more welly at a much lower pricepoint. But perhaps a focus on realtime embedded applications will help here.

I’d like to see a library like WiringPi built for it that can easily have wrappers for others languages implemented.

I think it’ll be ideal as a home API server that I can put anywhere and forget about.

Another area it could shine, due to its tiny size and low power consumption is robotics. See my comment below about Gobot.

Node.js partial success

After an initial play around with it, I decided to try out Node and Go. Node was built by a community member but is back on version 0.10.5.

I copied the Node executable and libv8 to a USB stick and plugged that into the Onion standard “dock”. I mounted it and ran hello world successfully. Hurrah!

But then I realised it doesn’t have NPM. So I put together a simple Tweeting App, did the NPM install on my Fedora VM and then copied everything to the USB stick.

The code which ran fine on Fedora crapped out with “not authenticated” on the Onion. I tried two other Twitter modules with the same result. I wasn’t able to see any other error apart from Twitter complaining about authentication.

So I gave up on Node for the moment.

Golang 1.1.2 first failed attempt

On to Go and a giant big rabbit hole.

So you can’t get a recent version of Go for MIPS. However, one smart person forked OpenWRT and added Go support via gccgo. Yay it’s Go, boo it’s Go 1.1.2.

But I thought it’d be a good experience to try building OpenWRT from scratch anyway. The instructions here and here are pretty straightforward and I managed to build the Gnu cross-compile toolchain inside a Fedora 22 VM on Windows 10.

NOTE: DO NOT DO THE FOLLOWING. IT DIDN’T WORK. FOLLOW THE STEPS LATER FOR CLEAN NEW OPENWRT

git clone git@github.com:GeertJohan/openwrt-go.git openwrt
cd openwrt
./scripts/feeds update -a
./scripts/feeds install -a
cp ~/Desktop/scons-2.3.5.tar.gz dl (needed to download this manually as it was missing)
cp ~/Desktop/openssl-1.0.2c.tar.gz dl (needed to download this manually as it was missing)
make menuconfig

In menuconfig you have to enable a few things:

  • -> Advanced configuration options
  • –> Toolchain options
  • —> C library implementation
  • —-> Use eglibc
  • -> Advanced configuration options
  • –> Toolchain options
  • —> Select Build/Install gccgo

Then save and exit, followed by:

make

Several hours later on my old i7 laptop, I had everything I needed.

Then a simple helloworld Web Server helloweb.go that only uses standard library features:

package main

import (
    "fmt"
    "net/http"
)

func handler(w http.ResponseWriter, r *http.Request) {
    fmt.Fprintf(w, "Hi there, I love %s!", r.URL.Path[1:])
}

func main() {
    http.HandleFunc("/", handler)
    http.ListenAndServe(":8080", nil)
}

Create ~/openwrt.config which consists of

export STAGING_DIR=/home/conor/openwrt/staging_dir 
export TOOLCHAIN_DIR=$STAGING_DIR/toolchain-mips_34kc_gcc-4.8-linaro_glibc-2.19 
export LDCFLAGS=$TOOLCHAIN_DIR/usr/lib 
export LD_LIBRARY_PATH=$TOOLCHAIN_DIR/usr/lib 
export PATH=$TOOLCHAIN_DIR/bin:$PATH

Then build it:

. ~/openwrt.config
mips_gccgo -Wall -o helloweb_static_libgo helloweb.go -static-libgo

I copied it over to the Onion but no joy. It just kept saying “not found”. Distant memories told me this was related to libraries and versions but nothing I tried worked. So I took a break.

Golang 1.1.2 second successful attempt

A while later I decided that what I needed to do was build OpenWRT for the Onion but then I hit a blocker. Onion support was added to OpenWRT in July but the latest version of the toolchain that included Go was from May. So I bit the bullet and manually “cherry-picked” all of the author’s changes from the older toolchain into the latest version of OpenWRT.

You can get the patchfile I generated here and apply it.

NOTE: THESE STEPS WORK OK.

Now to build from scratch again:

sudo dnf install -y subversion binutils bzip2 gcc gcc-c++ gawk gettext flex ncurses-devel zlib-devel zlib-static make patch unzip perl-ExtUtils-MakeMaker glibc glibc-devel glibc-static quilt sed sdcc intltool sharutils bison wget

. ~/openwrt.config   (see the contents of that file in the first failed attempt)

rm -rf ~/openwrt
git clone git://git.openwrt.org/openwrt.git openwrt
cd openwrt
nano feeds.conf.default

and append the following:

src-git onion https://github.com/OnionIoT/OpenWRT-Packages.git

Then:

scripts/feeds update -a

make menuconfig

Note you have to include the same menuconfig settings as before i.e.

  • -> Advanced configuration options
  • –> Toolchain options
  • —> C library implementation
  • —-> Use eglibc
  • -> Advanced configuration options
  • –> Toolchain options
  • —> Select Build/Install gccgo

Plus the following for both the Onion and USB stick. This uses some instructions from the Onion site:

  1. Target System is Atheros AR7xxx/AR9xxx
  2. Subtarget is Generic
  3. Target Profile is Onion Omega
  4. Target Images is squashfs
  5. Add kmod-fs-vfat
  6. Add kmod-nls-cp437
make

Several hours later again, I finally had a version of the firmware that included Go support and ran on the Onion by doing the following on the Onion:

cd /tmp
scp conor@192.168.0.9:/mnt/disk2/software/openwrt-ar71xx-generic-onion-omega-squashfs-factory.bin .
sysupgrade openwrt-ar71xx-generic-onion-omega-squashfs-factory.bin 

Hello World Web Server in Go on the Onion Omega

Back to helloworld on the Fedora 22 VM:

alias mips_gccgo='mips-openwrt-linux-gccgo -Wl,-R,/home/conor/openwrt/staging_dir/toolchain-mips_34kc_gcc-4.8-linaro_glibc-2.19/lib/gcc/mips-openwrt-linux-gnu/4.8.3 -L /home/conor/openwrt/staging_dir/toolchain-mips_34kc_gcc-4.8.0-linaro_glibc-2.19/lib'

mips_gccgo -Wall -o helloweb_static_libgo helloweb.go -static-libgo

Copy to the Onion and run it with a simple ./helloweb_static_libgo

Hurrah, Hello World in Go on the Onion!

I love mac and cheese

Tweeting from the Onion Omega in Go

I should have left it at that but no, I wanted to Tweet from the Onion. My problems multiplied. Basically, gccgo doesn’t have all the bells and whistles of recent Go and can’t handle included packages easily. After some reading and playing, I managed to build a Tweeting App that used the Twittergo package. Note you need a local Fedora version of Go installed and configured for “go get” to work (or just git clone). My $GOPATH is /home/conor/gitwork/go

I used the example from Twittergo to send the tweet, with the same mods to remove paths from the imports as the other files.

. ~/openwrt.config

cd ~/gitwork/go/src/github.com
go get github.com/kurrik/twittergo
go get github.com/kurrik/oauth1a
go get github.com/kurrik/json
cd kurrik/json
mips-openwrt-linux-gccgo -c json.go
cd ../oauth1a
mips-openwrt-linux-gccgo -c oauth1a.go userconfig.go
cd ../twittergo
cp ../json/json.o .
cp ../oauth1a/oauth1a.o .
emacs twittergo.go  (change github.com/kurrik/oauth1a to oauth1a)
emacs models.go  (change github.com/kurrik/json to json)
mips-openwrt-linux-gccgo -c twittergo.go models.go
emacs tweetomega.go
mips_gccgo -Wall -o tweetomega main.go -static-libgo json.o  oauth1a.o twittergo.o
gedit CREDENTIALS

I was nearly there. The code ran but threw an error almost immediately about x509 root certs being missing. I ran all of the following, which seemed to fix it (but I’m not sure if all needed):

opkg update
opkg install ca-certificates
opkg install openssl-util
opkg install curl
wget http://curl.haxx.se/ca/cacert.pem
mv cacert.pem /etc/ssl/certs/ca-certificates.crt
scp conor@192.168.0.9:/mnt/disk2/software/CREDENTIALS .
scp conor@192.168.0.9:/mnt/disk2/software/tweetomega .
./tweetomega

And finally ta-daaaa, a Tweet from the Omega:

Tweetin Omega

I now suspect that the Node.js error may have been exactly the same thing but just hidden so I’ll go back and try the same for it.

Final notes

  1. That custom firmware I built is missing all of the Onion’s own stuff and I’m not sure how to add that. However you can easily re-install the latest factory Onion image by wgetting it using the URL you find in this file into /tmp using sysupgrade name_of_image.
  2. We really need Go 1.6 to support MIPS. I think the Onion is a great device for running Go. We might even get Gobots running.

03 Nov 2015, 08:22

All the gory tech behind our Halloween Hallway of Horror

Despite starting weeks earlier than usual, Halloween still involved a day of last minute panic to bring everything together. The end result was this:

The basic setup was an update of ideas from previous years and consisted of the following.

3D-printed Mummy in Coffin Doorbell

This was my favourite aspect of the whole thing. I spotted a cool 3D design on Thingiverse and realised I could turn it into a doorbell by dremeling a hole in the back and hot-glueing the mummy to a simple push button.

Mummy Doorbell 1

In fact the button was one I originally bought in 2012 when I got back into electronics. There was a small bug in my debounce code which I discovered too late and meant that kids had to press the button twice. But overall only a few failed to figure it out.

Mummy Doorbell 2

Adafruit Audio breakout board and amp with speakers

I had intended everything to be Arduino and ESP8266 (running Arduino code) only so I needed some way of playing the scream. In previous years I used a Raspberry Pi (successfully) and a really crappy device (less successfully).

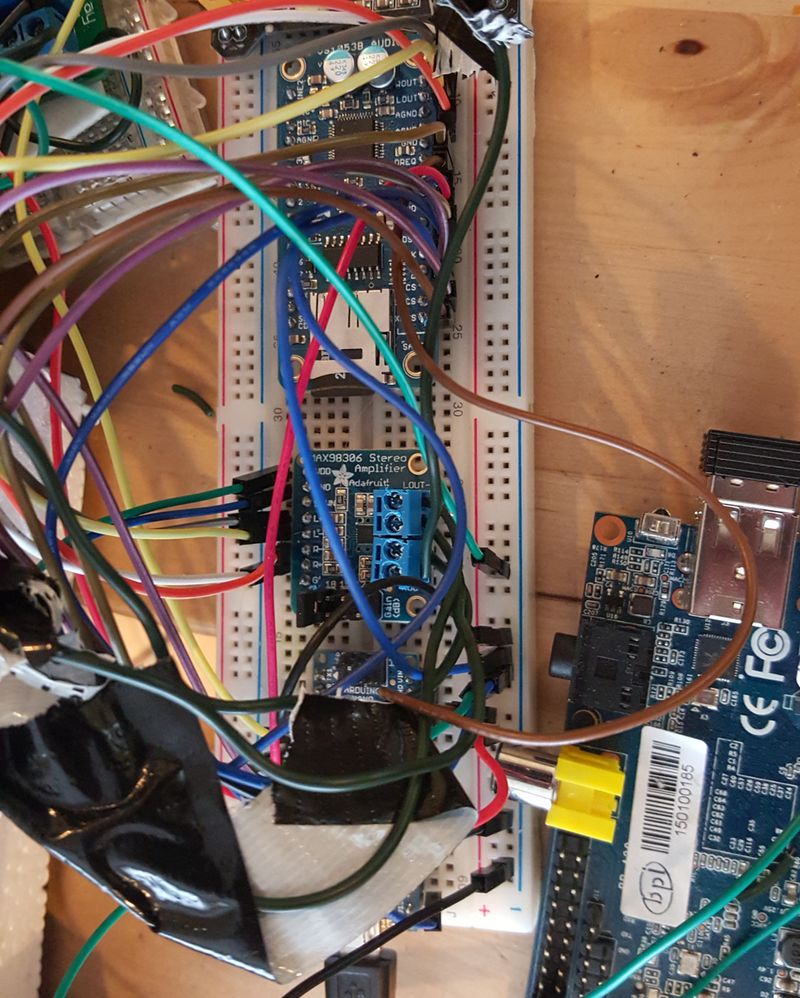
In a bizarre twist to the BE Maker Kit Indiegogo scam, one of the people involved somehow got a Florida company to provide free electronics to the right amount. I used this to buy the Adafruit VS1053 Audio board and Adafruit MAX98306 Audio Amp. The wiring on this looks complicated but it’s straight out of their tutorial.

Scary Sounds

Audio was courtesy of youtube-dl and WinFF on this clip from YouTube.

The Arduino Nano for this was the “Master” device. It detected the doorbell press and then started playing the file on the SD card and sent a high signal both to the Banana Pi for the LED strip and the Arduino Uno for the relays controlling the skull. It’s basically the Adafruit demo VS1053 code with a few extra lines added by me. The code for that is here on Gist.

Wifi Controlled RGB LED Strip using a Banana Pi

I finally ordered a bog-standard 5 metre 5050 RGB LED strip from dx.com over the summer. The value on these things is just staggering at less than €20.

RGB LED

They come with a dedicated remote control and just need a decent PSU to provide the power. Myself and the kids had great fun illuminating my entire home office in a range of colours.

But the challenge for Halloween was how to control it. I could have run irrecord on an ODROID C1 or Banana Pi to reverse engineer the remote control protocol and then use the RC transmitter I bought on DX. But luckily someone told Hackaday about the first ESP8266-powered commercial product they had found. It was a €9 Wifi H801 control module for RGB LED strips! I just had to get one.

Wifi RGB LED

It’s a brilliant little box that is easy to wire up and has a simple Android App for control. You connect to the internal Wifi Access Point it provides to do this. Here is the brilliant piece: You then use the app to tell the module to connect to your own Wifi router and then you do the same with the phone. Now your RGB LED strip is on your network!

But it gets better. A very smart person reverse-engineered the basic over-the-air protocol that the app uses to control the Wifi module. Unfortunately he was using a slightly different module to me and it didn’t work. I then spent a week of evenings learning all about Wireshark and Netcat. I was able to do the same as him and find the basic UDP control protocol (only minor difference in the packets)

In summary:

  • OFF: \xfb\xeb\x00\x00\x00\x00\x00\x9f\x97\x9d\x00
  • RED: \xfb\xeb\xff\x00\x00\x00\x00\x9f\x97\x9d\x00
  • GREEN: \xfb\xeb\x00\xff\x00\x00\x00\x9f\x97\x9d\x00
  • BLUE: \xfb\xeb\x00\x00\xff\x00\x00\x9f\x97\x9d\x00

My plan was to use a NodeMCU ESP8266 module to send the relevant commands, using either NodeMCU LUA or the Arduino port to ESP8266 but I ran out of time to experiment.

So I had Netcat working happily on the Banana Pi running Fedora but I also needed to be able to use the GPIO pins to tell the BPi when to turn on/off the LED strip. I then made the classic mistake of panicking on Halloween morning and switching to the RaspberryPi so I could use WiringPi for GPIO. Except the Netcat commands hung on the RPi (still no idea why).

Some Googling revealed that WiringPi had been ported to Raspbian on the BPi so I tried that. Same Netcat problem! So I took a chance and re-inserted the Fedora SD card and downloaded the BPi version of WiringPi. Result! It compiled and ran perfectly.

The I moved on to several hours of trying to write a Bash script to monitor a GPIO pin using WiringPi and control the RGB LED strip with echo/netcat. All I will say about that is I am never ever writing a Bash script again (space-sensitive around brackets/equals for the love of god). This is the final result and, to be fair, it worked seamlessly:


#!/bin/bash
sets=`/usr/local/bin/gpio mode 7 down`
setit=$sets
state="low"
echo -e '\xfb\xeb\x00\x00\x00\x00\x00\x9f\x97\x9d\x00' | nc -v -u 192.168.0.128 30977
sleep 1
while :
do
    pins=`/usr/local/bin/gpio read 7`
    if [ $pins = "1" ]; then
        if [ $state = "low" ]; then
            echo -e '\xfb\xeb\xff\x00\x00\x00\x00\x9f\x97\x9d\x00' | nc -v -u 192.168.0.128 30977
            state="high"
            echo high 
        fi
    else
        if [ $state = "high" ]; then
           echo -e '\xfb\xeb\x00\x00\x00\x00\x00\x9f\x97\x9d\x00' | nc -v -u 192.168.0.128 30977
           state="low"
           echo low
        fi
    fi
done

But I was so horrified by Bash, I did a quick and dirty re-write to Go this morning. It uses the Golang bindings to WiringPi and seems to work very well.

So the strip was now sorted. On to the rotating skull.

An anatomically correct skull with scary eyes

The skull idea came from a wonderful tested.com video where special effects artist Frank Ippolito bought a cheap skull on Amazon and then used latex, cotton wool and paint to turn it into a horrific burn-victim thing.

I thought we could do the same and found a skull on Amazon UK. It arrived and looked great apart from the lack of a movable jaw. But it then sat there for months with no progress due to me being artistically challenged.

As an alternative I thought about doing something with eyes so I got some half-eyes from Amazon too They were a smidge small but fit for purpose. I grabbed some of my old tiny micro-servos which I have never found a use for and hot-glued the eyes to them. A bit of messing with the range of movement and I had a vaguely spooky setup.

But the fact that you could see the servos and they move pretty slowly meant I was a bit disappointed. I tried to vamp them up a bit more by adding neopixel ring but it was too big so I switched to a single funky Adafruit RGB neopixel on each one. So now I had 6 wires coming out of each eye.

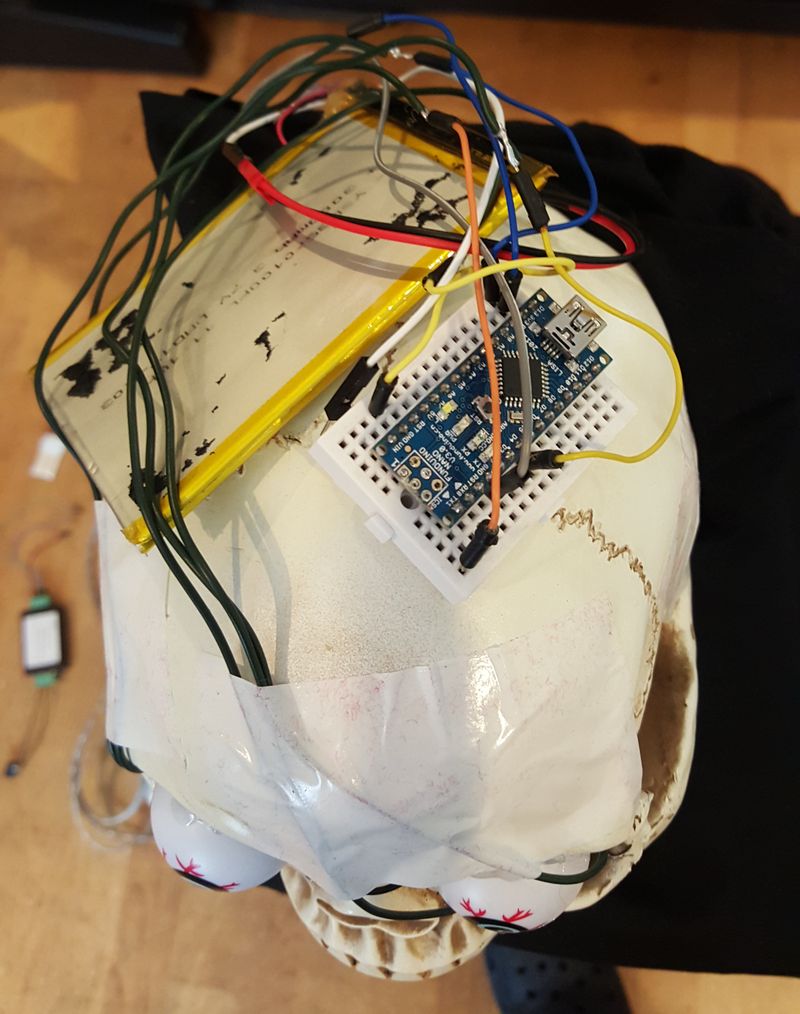
Finally on Saturday morning I went to finish this bit and decided it was too much work to get the Arduino code tweaked to do 2x Neopixels and 2x servos and somehow trigger them on/off on a potentially rotating head. At this point I found the silly fake-eye pingpong balls from last year. A quick cut in the back and I hot-glued a Neopixel to each one. I then hot-glued the eyes into the skull and wired the Neopixels to an Arduino Nano.

Skull Arduino

I stuck the Nano and a Lipo battery to the top of the skull and covered it with a cool Buff. Having the eyes on permanently removed a little bit of the element of surprise but I still thought it worked well. The code for the Neopixels was just the standard Adafruit strand test.

Buff Skull

Making the skull rotate

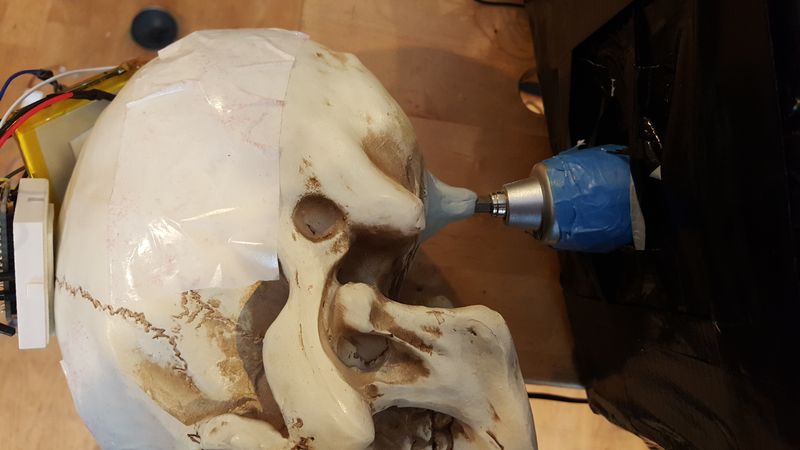
I had always known I would rotate the skull in some fashion but for a while I wasn’t sure how. Quite a few weeks ago I came up with the idea to cement a hex driver into the bottom of the skull and sit it on top of a cheap crap €20 electric screwdriver I got ages ago from Woodies.

Screwdriver1

As a screwdriver it was rubbish due to slowness and lack of torque. As a skull-rotator it was awesome, spinning the skull around at high speed.

Screwdriver2

Of course I left the difficult bits until a week before Halloween when I sat down and tried to figure out how to control it all. The first attempt was with a dirt cheap double relay board I got 3 years ago and never used. But I couldn’t figure out how to make it go forwards and reverse. I then tried an old knock-off Adafruit Motor Shield but it couldn’t deliver enough juice (even with a 7.2V LiPo) to overcome the motor’s inertia. Finally I found a relay circuit that did forward/reverse and it worked like a charm.

Circuit

Relay

But how was I going to handle starting/stopping the skull so it was facing away (and potentially covered) initially and then rotating at the right time and stopping in the right position? Of course I left that to Halloween itself.

I used polystyrene and duct tape to brace the screwdriver. Then I setup two limit switches. I then applied power. The head spun around and ripped the switches off their mounts. Damn. So another quick executive decision was made. The head would start rotating when the doorbell was pressed and then stop after 10-15 seconds. Which meant some kids would get the full scary effect whilst others would see the flashing eyes before they got to the door.

Tying it all together

This turned out to be pretty easy. I have a ton of decent wire from a dead Christmas tree light string and used that to connect everything up. The doorbell connected to one Arudino which then toggled a pin which the other Arduinos were connected to. After N seconds, it toggled the pin the other way to shut it all down.

Wiring

It worked very very well.

Next year?

Hmm not sure. I wanted to do something with ghosts flying down zip wires a few years ago but I just didn’t have the knowhow. I’m feeling a lot more confident about that now.

23 Oct 2015, 13:54

Facebook is the Amazon AWS Killer

AWS is now an $8Bn business for Amazon. Could anyone have predicted that in 1997 or even 2007? This week I was talking to a few people about who might be able to disrupt AWS. It won’t be easy. We immediately discounted the old guys like HP, IBM, Dell etc and even Google seems to be a complete also-ran in IaaS. Microsoft Azure might have potential.

PaaS is separate as it’s higher up the stack and makes use of IaaS. I expect Open Source PaaS like OpenShift 3 to grow very quickly in the coming years as it makes deployment and management of Apps incredibly easy. Where PaaS might hurt AWS is in abstracting what IaaS you are using, so as long as the feature set is there, you don’t care where your Apps are running (apart from Geo lag and data protection laws).

One of the people I talked to thinks that AWS will be slayed by a startup who may not even exist yet. He also felt that smart VPSes like DigitalOcean might do it. I’m a huge fan of DO and gained enormous reliability and speed by switching to it from Google Compute Engine/CloudSQL whilst reducing my bill by 2/3rds. But it still feels like an SME/SMB or individual developer solution.

So I’m predicting it’ll be Facebook. Why? Think about the following:

The big open question is how they do their virtualisation and containerisation. If they have that nailed, then I think they might go for it.

Let’s re-visit this post in 5 years.

29 Sep 2015, 17:35

Running the latest Chromium 45 on Debian Jessie on your Raspberry Pi 2

For some odd reason, Google and others stopped auto-generating armhf binaries of Chromium last year. Version 37 was the last one I could find. Luckily the Ubuntu guys have been building it all along and their version 45 installs really easily on the all-new Debian/Raspbian Jessie on your Raspberry Pi 2.

Pi loves Chromium

This was a surprise as this kind of thing usually degenerates into dependency hell.

Here you go (updatred to mention libgcrypt):

wget http://ftp.us.debian.org/debian/pool/main/libg/libgcrypt11/libgcrypt11_1.5.0-5+deb7u3_armhf.deb
wget http://launchpadlibrarian.net/218525709/chromium-browser_45.0.2454.85-0ubuntu0.14.04.1.1097_armhf.deb
wget http://launchpadlibrarian.net/218525711/chromium-codecs-ffmpeg-extra_45.0.2454.85-0ubuntu0.14.04.1.1097_armhf.deb
sudo dpkg -i libgcrypt11_1.5.0-5+deb7u3_armhf.deb
sudo dpkg -i chromium-codecs-ffmpeg-extra_45.0.2454.85-0ubuntu0.14.04.1.1097_armhf.deb
sudo dpkg -i chromium-browser_45.0.2454.85-0ubuntu0.14.04.1.1097_armhf.deb

It even appears correctly in your desktop menus!

Note: Some users reporting issues in comments that I’m not seeing.

Apart from security fixes and the latest Chromium features, you also get full access to most of the Apps and Extensions in the Chrome Web Store. This includes the Espruino Chrome App, which means you or your kids now have everything you need to develop and deploy Embedded and IoT projects for under €100. Honestly, that’s revolutionary.

Pi loves Espruino

20 Sep 2015, 13:03

TingoDB and SQLite instead of MongoDB and MySQL for tiny projects or Raspberry Pi

As an old Embedded guy who actually cares about resource usage, I’ve been bothered for quite a while by the number of trivial Node.js projects out there that require a full-blown MongoDB or MySQL server to operate. It’s a particular problem on the Raspberry Pi or small DigitalOcean Droplets. In many cases a simple SQLite DB or TingoDB is more than sufficient.

If your Web App has 2 registered users and 100 visitors per day, may just maybe you don’t need MongoDB or MySQL. I have a set of small Node.js projects now where I use the following combinations and they all work well. Anything you are doing in-house on a Raspberry Pi should absolutely use one of these. In fact I’m not even sure recent Mongos run on the RPi 1?

Dulcimer, LevelUP and LevelDB

LevelDB and LevelUP are well known and widely used. I think Dulcimer probably less so. It’s a Mongoose-ish ORM for LevelDB. I was able to tie it into PassportJS without much effort to handle users/sessions/etc. I have two setups using it and both have been running for many months on d’internet with zero problems. In one case it’s a small stats dashboard running on DigitalOcean with a few registered users who check it maybe once a day. The other one is a registration system for people requesting access to some internal work resources. All submissions go into LevelDB. This is running on OpenShift Online.

TingoDB and Tungus

Of the NoSQL file-based databases, this seems to have the lowest profile and I think it deserves a lot of attention. TingoDB emulates most of the common MongoDB APIs and Tungus emulates most of the Mongoose ones. I was able to take a random Node.js project off GitHub which is based on MongoDB/Mongoose/Mongoskin and get it running using TingoDB/Tungus on an RPi with only a tiny bit of fiddling with the Agenda module. This is huge for those wanting to do NoSQL on Raspberry Pi. I’ll be playing a lot more with this setup in the coming weeks. You really should too.

SQLite, Knex and Bookshelf

Whilst the whole hipster dev world thinks NoSQL is the answer to everything, good old relational databases just keep on trucking. I’ve used SQLite many times over the years for simple projects and it has always worked well. I hadn’t realised until recently that the main SQL ORMs on Node.js support it out of the box. So again, if you have a project that needs a relational DB and doesn’t need huge scale, you should be looking at SQLite. I’m currently wrapping up a simple in-house project using SQLite with Knex and Bookshelf on a Raspberry Pi. The DB hold simple relationships between devices and their status.

The latter two setups above also have the big advantage that you can use them in development or in the early production stages and then you can drop in MongoDB or MySQL at a later stage if needed, without any re-coding.

20 Sep 2015, 11:38

Running ZeroMQ with Node.js on Raspberry Pi

ZeroMQ is a lightweight messaging library and looks ideal for lower powered devices like the RPi. Building and running is pretty easy. These are really just notes for myself for future reference.

I don’t actually need a messaging system yet but I wanted to play around with one. Running a simple Request / Reply setup with Node.js on both Windows 10 and RPi was interesting. One advantage a message queue gives you over REST is that the receiver can be out of action and still get all transmitted messages when it recovers. You also have things like Pub/Sub etc. I’ve been running the code from here 100% reliably for two days now on both setups. At some point I’ll check max throughput on a Pi.

Installation on Raspberry Pi:

cd
sudo apt-get install libtool pkg-config build-essential autoconf automake
mkdir build
cd build/
wget https://download.libsodium.org/libsodium/releases/libsodium-1.0.3.tar.gz
tar -zxvf libsodium-1.0.3.tar.gz
cd libsodium-1.0.3/
./configure
make
sudo make install
cd ..
wget http://download.zeromq.org/zeromq-4.1.3.tar.gz
tar -zxvf zeromq-4.1.3.tar.gz
cd zeromq-4.1.3/
./configure
make
sudo make install
sudo ldconfig

Test code for Request / Reply from here:

server.js:

var zmq = require("zmq");  
var socket = zmq.socket("req");  
var counter = 0;

// Just a helper function for logging to the console with a timestamp.
function logToConsole (message) {  
    console.log("[" + new Date().toLocaleTimeString() + "] " + message);
}

function sendMessage (message) {  
    logToConsole("Sending: " + message);
    socket.send(message);
}

// Add a callback for the event that is invoked when we receive a message.
socket.on("message", function (message) {  
    // Convert the message into a string and log to the console.
    logToConsole("Response: " + message.toString("utf8"));
});

// Begin listening for connections on all IP addresses on port 9998.
socket.bind("tcp://*:9998", function (error) {  
    if (error) {
        logToConsole("Failed to bind socket: " + error.message);
        process.exit(0);
    }
    else {
        logToConsole("Server listening on port 9998");

        // Increment the counter and send the value to the clients every second.
        setInterval(function () { sendMessage(counter++); }, 1000);
    }
});

client.js:

var zmq = require("zmq");  
var socket = zmq.socket("rep");

// Just a helper function for logging to the console with a timestamp.
function logToConsole (message) {  
    console.log("[" + new Date().toLocaleTimeString() + "] " + message);
}

// Add a callback for the event that is invoked when we receive a message.
socket.on("message", function (message) {  
    // Convert the message into a string and log to the console.
    logToConsole("Received message: " + message.toString("utf8"));

    // Send the message back aa a reply to the server.
    socket.send(message);
});

// Connect to the server instance.
socket.connect('tcp://127.0.0.1:9998');  

23 Aug 2015, 14:42

TIL you can import 3D models from Tinkercad to Minecraft. How cool is that?

We had friends over from the US last weekend and their kids loved my Printrbot 3D printer. They had learned Tinkercad in school so that’s what they used to create things so they could print them out. They are now hounding their parents for a printer. Oops :-) But I noticed a “Download to Minecraft” option in Tinkercad and finally just had a chance to try it out. Wow!

In Tinkercad

It’s incredibly easy. Take any model from Tinkercad and pick the Minecraft option. You may have to tweak the sizing when you are doing it seriously. Then install the MCEdit Minecraft editor and import the file into one of your worlds. Then load up Minecraft and thar she blows.

In Minecraft

I totally love the intersection of 3D design, 3D printing and Minecraft - the real and the virtual coming together. The younger kids are gonna be psyched when I show em!

22 Jul 2015, 08:14

Creating an OTP fob compatible with Google Authenticator using an Espruino Pico

Now that the Espruino Pico has (beta) HID support, it can pretend to be a keyboard or mouse (or other HID compatible device). This makes it possible to send characters to the active window on your Windows/Linux/Mac PC. I’ve cobbled together some code which turns the Pico into a device like a YubiKey. Press the button and get the latest auth code pasted automatically for you.

Espruino Pico OTP

This code is basically just from three sources, merged together with a few tiny tweaks by me.

(Note I’ve just discovered that Espruino has its own hmac implementation so I can possibly drop jsSHA)

The main thing you need for this is your Google Authenticator Secret. Unfortunately you can only get this when you have access to the original QR code that you scanned (it’s in the URL). But if you are setting up 2FA access to a new service e.g. Digital Ocean, then you can grab the secret and save it in the code. If your system also uses a PIN (e.g. SSO on some corporate sites), save that in the code too.

You’ll need a very recent pre-release Firmware for this to work at all e.g. from here

Once that’s flashed, go into Settings on the Web IDE and make sure “Set Current Time” is ticked in the Communications section. Auth Fobs rely on having an accurate time and that setting keeps unsetting itself on my PC.

Now copy the code below onto the Espruino using the Web IDE and then type save() to make sure it can survive a power-cycle. Remove and re-insert the Pico, press the button and you should get the auth code you need.

Now for the bad news: This currently doesn’t work on my Windows 8.1 PC but works semi-reliably on my work MBP. Once the HID code makes it to production, I’m sure it will work fine.

// Code assembled by Conor O'Neill from three sources. None of it copyright me.
// This code copyright Brian Turek https://github.com/Caligatio/jsSHA https://github.com/Caligatio/jsSHA/blob/master/LICENSE
'use strict';(function(E){function t(c,a,e){var g=0,b=[],d=0,f,k,l,h,m,w,n,q=!1,r=!1,p=[],t=[],v,u=!1;e=e||{};f=e.encoding||"UTF8";v=e.numRounds||1;l=y(a,f);if(v!==parseInt(v,10)||1>v)throw Error("numRounds must a integer >= 1");if("SHA-1"===c)m=512,w=z,n=F,h=160;else throw Error("Chosen SHA variant is not supported");k=x(c);this.setHMACKey=function(a,b,d){var e;if(!0===r)throw Error("HMAC key already set");if(!0===q)throw Error("Cannot set HMAC key after finalizing hash");if(!0===u)throw Error("Cannot set HMAC key after calling update");
f=(d||{}).encoding||"UTF8";b=y(b,f)(a);a=b.binLen;b=b.value;e=m>>>3;d=e/4-1;if(e<a/8){for(b=n(b,a,0,x(c));b.length<=d;)b.push(0);b[d]&=4294967040}else if(e>a/8){for(;b.length<=d;)b.push(0);b[d]&=4294967040}for(a=0;a<=d;a+=1)p[a]=b[a]^909522486,t[a]=b[a]^1549556828;k=w(p,k);g=m;r=!0};this.update=function(a){var c,e,f,h=0,n=m>>>5;c=l(a,b,d);a=c.binLen;e=c.value;c=a>>>5;for(f=0;f<c;f+=n)h+m<=a&&(k=w(e.slice(f,f+n),k),h+=m);g+=h;b=e.slice(h>>>5);d=a%m;u=!0};this.getHash=function(a,e){var f,l,m;if(!0===
r)throw Error("Cannot call getHash after setting HMAC key");m=A(e);switch(a){case "HEX":f=function(a){return B(a,m)};break;case "B64":f=function(a){return C(a,m)};break;case "BYTES":f=D;break;default:throw Error("format must be HEX, B64, or BYTES");}if(!1===q)for(k=n(b,d,g,k),l=1;l<v;l+=1)k=n(k,h,0,x(c));q=!0;return f(k)};this.getHMAC=function(a,e){var f,l,p;if(!1===r)throw Error("Cannot call getHMAC without first setting HMAC key");p=A(e);switch(a){case "HEX":f=function(a){return B(a,p)};break;case "B64":f=
function(a){return C(a,p)};break;case "BYTES":f=D;break;default:throw Error("outputFormat must be HEX, B64, or BYTES");}!1===q&&(l=n(b,d,g,k),k=w(t,x(c)),k=n(l,h,m,k));q=!0;return f(k)}}function G(c,a,e){var g=c.length,b,d,f,k,l;a=a||[0];e=e||0;l=e>>>3;if(0!==g%2)throw Error("String of HEX type must be in byte increments");for(b=0;b<g;b+=2){d=parseInt(c.substr(b,2),16);if(isNaN(d))throw Error("String of HEX type contains invalid characters");k=(b>>>1)+l;for(f=k>>>2;a.length<=f;)a.push(0);a[f]|=d<<
8*(3-k%4)}return{value:a,binLen:4*g+e}}function H(c,a,e){var g=[],b,d,f,k,g=a||[0];e=e||0;d=e>>>3;for(b=0;b<c.length;b+=1)a=c.charCodeAt(b),k=b+d,f=k>>>2,g.length<=f&&g.push(0),g[f]|=a<<8*(3-k%4);return{value:g,binLen:8*c.length+e}}function I(c,a,e){var g=[],b=0,d,f,k,l,h,m,g=a||[0];e=e||0;a=e>>>3;if(-1===c.search(/^[a-zA-Z0-9=+\/]+$/))throw Error("Invalid character in base-64 string");f=c.indexOf("=");c=c.replace(/\=/g,"");if(-1!==f&&f<c.length)throw Error("Invalid '=' found in base-64 string");
for(f=0;f<c.length;f+=4){h=c.substr(f,4);for(k=l=0;k<h.length;k+=1)d="ABCDEFGHIJKLMNOPQRSTUVWXYZabcdefghijklmnopqrstuvwxyz0123456789+/".indexOf(h[k]),l|=d<<18-6*k;for(k=0;k<h.length-1;k+=1){m=b+a;for(d=m>>>2;g.length<=d;)g.push(0);g[d]|=(l>>>16-8*k&255)<<8*(3-m%4);b+=1}}return{value:g,binLen:8*b+e}}function B(c,a){var e="",g=4*c.length,b,d;for(b=0;b<g;b+=1)d=c[b>>>2]>>>8*(3-b%4),e+="0123456789abcdef".charAt(d>>>4&15)+"0123456789abcdef".charAt(d&15);return a.outputUpper?e.toUpperCase():e}function C(c,
a){var e="",g=4*c.length,b,d,f;for(b=0;b<g;b+=3)for(f=b+1>>>2,d=c.length<=f?0:c[f],f=b+2>>>2,f=c.length<=f?0:c[f],f=(c[b>>>2]>>>8*(3-b%4)&255)<<16|(d>>>8*(3-(b+1)%4)&255)<<8|f>>>8*(3-(b+2)%4)&255,d=0;4>d;d+=1)8*b+6*d<=32*c.length?e+="ABCDEFGHIJKLMNOPQRSTUVWXYZabcdefghijklmnopqrstuvwxyz0123456789+/".charAt(f>>>6*(3-d)&63):e+=a.b64Pad;return e}function D(c){var a="",e=4*c.length,g,b;for(g=0;g<e;g+=1)b=c[g>>>2]>>>8*(3-g%4)&255,a+=String.fromCharCode(b);return a}function A(c){var a={outputUpper:!1,b64Pad:"="};
c=c||{};a.outputUpper=c.outputUpper||!1;a.b64Pad=c.b64Pad||"=";if("boolean"!==typeof a.outputUpper)throw Error("Invalid outputUpper formatting option");if("string"!==typeof a.b64Pad)throw Error("Invalid b64Pad formatting option");return a}function y(c,a){var e;switch(a){case "UTF8":case "UTF16BE":case "UTF16LE":break;default:throw Error("encoding must be UTF8, UTF16BE, or UTF16LE");}switch(c){case "HEX":e=G;break;case "TEXT":e=function(e,b,d){var f=[],c=[],l=0,h,m,p,n,q,f=b||[0];b=d||0;p=b>>>3;if("UTF8"===
a)for(h=0;h<e.length;h+=1)for(d=e.charCodeAt(h),c=[],128>d?c.push(d):2048>d?(c.push(192|d>>>6),c.push(128|d&63)):55296>d||57344<=d?c.push(224|d>>>12,128|d>>>6&63,128|d&63):(h+=1,d=65536+((d&1023)<<10|e.charCodeAt(h)&1023),c.push(240|d>>>18,128|d>>>12&63,128|d>>>6&63,128|d&63)),m=0;m<c.length;m+=1){q=l+p;for(n=q>>>2;f.length<=n;)f.push(0);f[n]|=c[m]<<8*(3-q%4);l+=1}else if("UTF16BE"===a||"UTF16LE"===a)for(h=0;h<e.length;h+=1){d=e.charCodeAt(h);"UTF16LE"===a&&(m=d&255,d=m<<8|d>>>8);q=l+p;for(n=q>>>
2;f.length<=n;)f.push(0);f[n]|=d<<8*(2-q%4);l+=2}return{value:f,binLen:8*l+b}};break;case "B64":e=I;break;case "BYTES":e=H;break;default:throw Error("format must be HEX, TEXT, B64, or BYTES");}return e}function r(c,a){return c<<a|c>>>32-a}function p(c,a){var e=(c&65535)+(a&65535);return((c>>>16)+(a>>>16)+(e>>>16)&65535)<<16|e&65535}function u(c,a,e,g,b){var d=(c&65535)+(a&65535)+(e&65535)+(g&65535)+(b&65535);return((c>>>16)+(a>>>16)+(e>>>16)+(g>>>16)+(b>>>16)+(d>>>16)&65535)<<16|d&65535}function x(c){if("SHA-1"===
c)c=[1732584193,4023233417,2562383102,271733878,3285377520];else throw Error("No SHA variants supported");return c}function z(c,a){var e=[],g,b,d,f,k,l,h;g=a[0];b=a[1];d=a[2];f=a[3];k=a[4];for(h=0;80>h;h+=1)e[h]=16>h?c[h]:r(e[h-3]^e[h-8]^e[h-14]^e[h-16],1),l=20>h?u(r(g,5),b&d^~b&f,k,1518500249,e[h]):40>h?u(r(g,5),b^d^f,k,1859775393,e[h]):60>h?u(r(g,5),b&d^b&f^d&f,k,2400959708,e[h]):u(r(g,5),b^d^f,k,3395469782,e[h]),k=f,f=d,d=r(b,30),b=g,g=l;a[0]=p(g,a[0]);a[1]=p(b,a[1]);a[2]=p(d,a[2]);a[3]=p(f,a[3]);
a[4]=p(k,a[4]);return a}function F(c,a,e,g){var b;for(b=(a+65>>>9<<4)+15;c.length<=b;)c.push(0);c[a>>>5]|=128<<24-a%32;c[b]=a+e;e=c.length;for(a=0;a<e;a+=16)g=z(c.slice(a,a+16),g);return g}"function"===typeof define&&define.amd?define(function(){return t}):"undefined"!==typeof exports?"undefined"!==typeof module&&module.exports?module.exports=exports=t:exports=t:E.jsSHA=t})(this);

// This code copyright Nic Raboy https://blog.nraboy.com/2014/10/generate-time-based-one-time-passwords-javascript/
TOTP = function() {

    var dec2hex = function(s) {
        return (s < 15.5 ? "0" : "") + Math.round(s).toString(16);
    };

    var hex2dec = function(s) {
        return parseInt(s, 16);
    };

    var leftpad = function(s, l, p) {
        if(l + 1 >= s.length) {
            s = Array(l + 1 - s.length).join(p) + s;
        }
        return s;
    };

    var base32tohex = function(base32) {
        var base32chars = "ABCDEFGHIJKLMNOPQRSTUVWXYZ234567";
        var bits = "";
        var hex = "";
        for(var i = 0; i < base32.length; i++) {
            var val = base32chars.indexOf(base32.charAt(i).toUpperCase());
            bits += leftpad(val.toString(2), 5, '0');
        }
        for(var i = 0; i + 4 <= bits.length; i+=4) {
            var chunk = bits.substr(i, 4);
            hex = hex + parseInt(chunk, 2).toString(16) ;
        }
        return hex;
    };

    this.getOTP = function(secret) {
        try {
            var epoch = Math.round(new Date().getTime() / 1000.0);
            var time = leftpad(dec2hex(Math.floor(epoch / 30)), 16, "0");
            var hmacObj = new jsSHA("SHA-1", "HEX");
			hmacObj.setHMACKey(base32tohex(secret), "HEX")
			hmacObj.update(time);
            var hmac = hmacObj.getHMAC("HEX");
            var offset = hex2dec(hmac.substring(hmac.length - 1));
            var otp = (hex2dec(hmac.substr(offset * 2, 8)) & hex2dec("7fffffff")) + "";
            otp = (otp).substr(otp.length - 6, 6);
        } catch (error) {
            throw error;
        }
        return otp;
    };

}

var totpObj = new TOTP();

// This code copyright Gordon Williams, Pur3 Ltd.,  https://github.com/espruino/Espruino/blob/master/LICENSE
var kb = require("USBKeyboard");

setWatch(function() {
  // These two lines by Conor O'Neill :-)
	var pin = "put_your_PIN_Prefix_here";
  kb.type(pin + totpObj.getOTP("put_your_google_authenticator_secret_here").toString(), function() {
        kb.tap(kb.KEY.ENTER);
    });
}, BTN, {debounce:100,repeat:true, edge:"rising"});

11 Jul 2015, 19:56

Node v0.10.40 and v0.12.7 for ARM v7 and v6 (Raspberry Pi, Raspberry Pi 2, Banana Pi, ODroid C1) available

I compiled both on a Banana Pi for a change. Nothing special for the 0.12 build, and ./configure –without-snapshot for the 0.10 build.

“make test” threw up the usual 7 minor errors or so.

I ran both Banana Pi and Raspberry Pi 2 without any immediate obvious issues.

Enjoy.

mkdir nodetemp
cd nodetemp
wget http://conoroneill.net.s3.amazonaws.com/wp-content/uploads/2015/07/node-v0.10.40-linux-arm-v7.tar.gz
tar -zxvf node-v0.10.40-linux-arm-v7.tar.gz
cd usr/local
sudo cp -R * /usr/local/

UPDATE: I also built 0.10.40 for Raspberry Pi 1 (i.e. Original Model) ARM V6 on a Series 1 Model B: * node-v0.10.40-linux-arm-v6.tar.gz

UPDATE 2: I also built 0.12.7 for Raspberry Pi 1 (i.e. Original Model) ARM V6 on a Series 1 Model B: * node-v0.12.7-linux-arm-v6.tar.gz